
In this section, we take a brief look at the screws, nuts and washers we will be using to construct our figures. There’s more to learn here than you might have thought.
 There are many types of screws. For most of our fastening needs, we will be using machine screws. Machine screws are threaded their entire length, and don’t come to a point. They are meant to attach either to a nut, or go into a threaded hole.
In the U.S., machine screws are usually specified by a series of numbers which refer to the various dimensions in inches. A typical screw is a #6-32 x 1/2. The first number refers to the diameter of the threaded part. There is a formula to convert this number to inches (multiply by 0.013 and add 0.06), but most people just remember that the bigger the number, the larger the diameter. We will be using #6, #4, and #2 screws.
The number after the dash is the number of threads per inch. While you can purchase screws with different threads, #6-32, #4-40, and #2-56 are by far the most common. All of our #6 hard ware is #6-32, all of the #4 is #4-40 and the #2 is #2-56.
 The last number is the length of the screw (just the threaded part – the head doesn’t count for this type of screw). Our most common sizes will be 1”, 3/4”, 1/2”, 3/8” and 1/4”. In general, you should choose the shortest possible screw that’s needed to do the job. (Extra long screws will just stick out, and might get caught on things.)
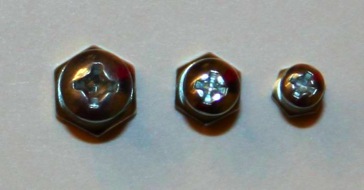 We will be using Phillips screws for all of our work. If you look at them from the top, they look like a cross. Phillips screws are generally preferred for this type of work over slotted screws because your screwdriver tends to stay in without slipping. Another benefit is that there are only a small number of standard Phillips screwdriver tip sizes. Our #6 screws use a #2 screwdriver. The #4 and #2 screws uses a #1 screwdriver. If you use the right size tip, it will fit snugly. Smaller tips will appear to work, but because they don’t fit tightly, the tip will tend to get chewed up if you are using a significant amount of force.
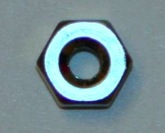 Nuts are generally simpler. A #6-32 nut will fit on any #6-32 screw. One area of confusion is that wrenches and nut drivers are sized by the width of the nut itself. For our nuts, a #6 nut is 5/16”, a #4 nut is 1/4”, and a #2 nut is 3/16”.
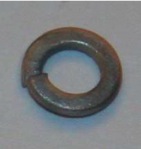 A major problem with standard nuts is that they tend to come loose with vibration. There are an astounding array of products aimed at preventing this. We will be using Split Lock Washers. A split lock washer is bent so that it acts like a little spring – a one turn spring. When you tighten down the screw, the spring is compressed. This keeps a force pushing the nut and screw apart, which puts pressure on the threads, increasing the friction.
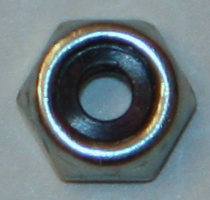 There will be times when you want to connect two pieces together to create a rotating joint. A crude solution is to drill a hole in each piece and connect them with a screw. In order to freely rotate around the screw, the screw and the nut cannot be tightened. In that case, an ordinary nut would quickly fall off. What you need is a nut that stays put, without having to tighten it against something. One solution is a Nylon-insert locknut. This is a nut which has a piece of Nylon in it with a slightly undersized hole. The Nylon makes it difficult for the screw to turn, whether or not the nut is tightened. When you use these, you will quickly notice that you can only turn them with your fingers until the screw reaches the Nylon part.
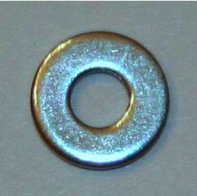 Our last piece of hardware is the humble flat washer. We will use flat washers for two different purposes – as a spacer, or to spread out force. If you wish to hold two pieces a small distance apart, putting some washers between the two pieces on the screw holding them together does the job. Don’t be afraid to use multiple washers to get the right separation.
When you are using a screw on a soft material, the small screw head might bite into the material as you tighten it down. Placing a washer between the screw head and the material can help spread out the force.
Of course, screws are not the only way to connect things together. A thoroughly modern approach is to use high tech industrial adhesives. By far, our favorite of these is 3M’s Very High Bond Tape, also known as VHB. This stuff is amazing. It is no ordinary tape. Comparing VHB to ordinary cellophane tape would be like comparing a fire hose to a water pistol. There are skyscrapers that are literally held together with VHB.
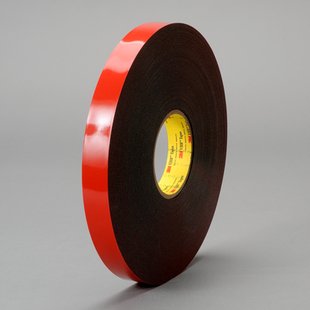 VHB tape comes in lots of different varieties. For attaching servos to strip Aluminum, 3M recommends products in the 5952 or 5962 series. It is available in a different lengths and widths. This is a double-sided (sticky on both sides), foam tape. The foam, which is about 1/16″ thick, allows the tape to stick well to objects that are not perfectly flat.
VHB is available from various industrial suppliers. You can often find it on Ebay for less. There is a consumer version of VHB that is sold in home improvement stores under the brand “Scotch Extreme Mounting Tape”.
VHB is very simple to work with. First, make sure the surfaces are clean. Sterile wipes, (available in almost any drug store), are good for cleaning the surface. Then simply cut a strip, and place on the one surface. Then, push that tape down hard. 3M recommends using a roller, but you can just use your fingers for a small piece. Next, peal off the backing, and attach the other piece. Again, push them together hard. The bond is instant, but will improve over the course of several hours. One of the best things about VHB is that even though it is very strong, you can remove it cleanly. Twisting usually is more effective at breaking the bond rather than just pulling the surfaces apart.
If you want to mount a servo very firmly, a great trick is to put tape on two surfaces (e.g. side and bottom) and attach it into a piece of anale aluminum. You can take this apart, but it will take a lot of work because you can’t really use the twisting trick.