
Arduino is a family of programmable microcontroller boards that are very popular in the electronics hobbyist community. Many schools use them for teaching introductory programming and robotics. And you can often find them locally at stores like Radio Shack. Typically, when people want to control servos with an Arduino. they write code which runs locally on the Arduino microcontroller, independent of a PC. However, it’s also easy to use an Arduino as a servo controller connected to a PC running VSA!
For this example, we will be using the popular Arduino Uno R3. USB power is typically sufficient to drive two microservos, without a separate power supply. So you can wire the servos as shown below:
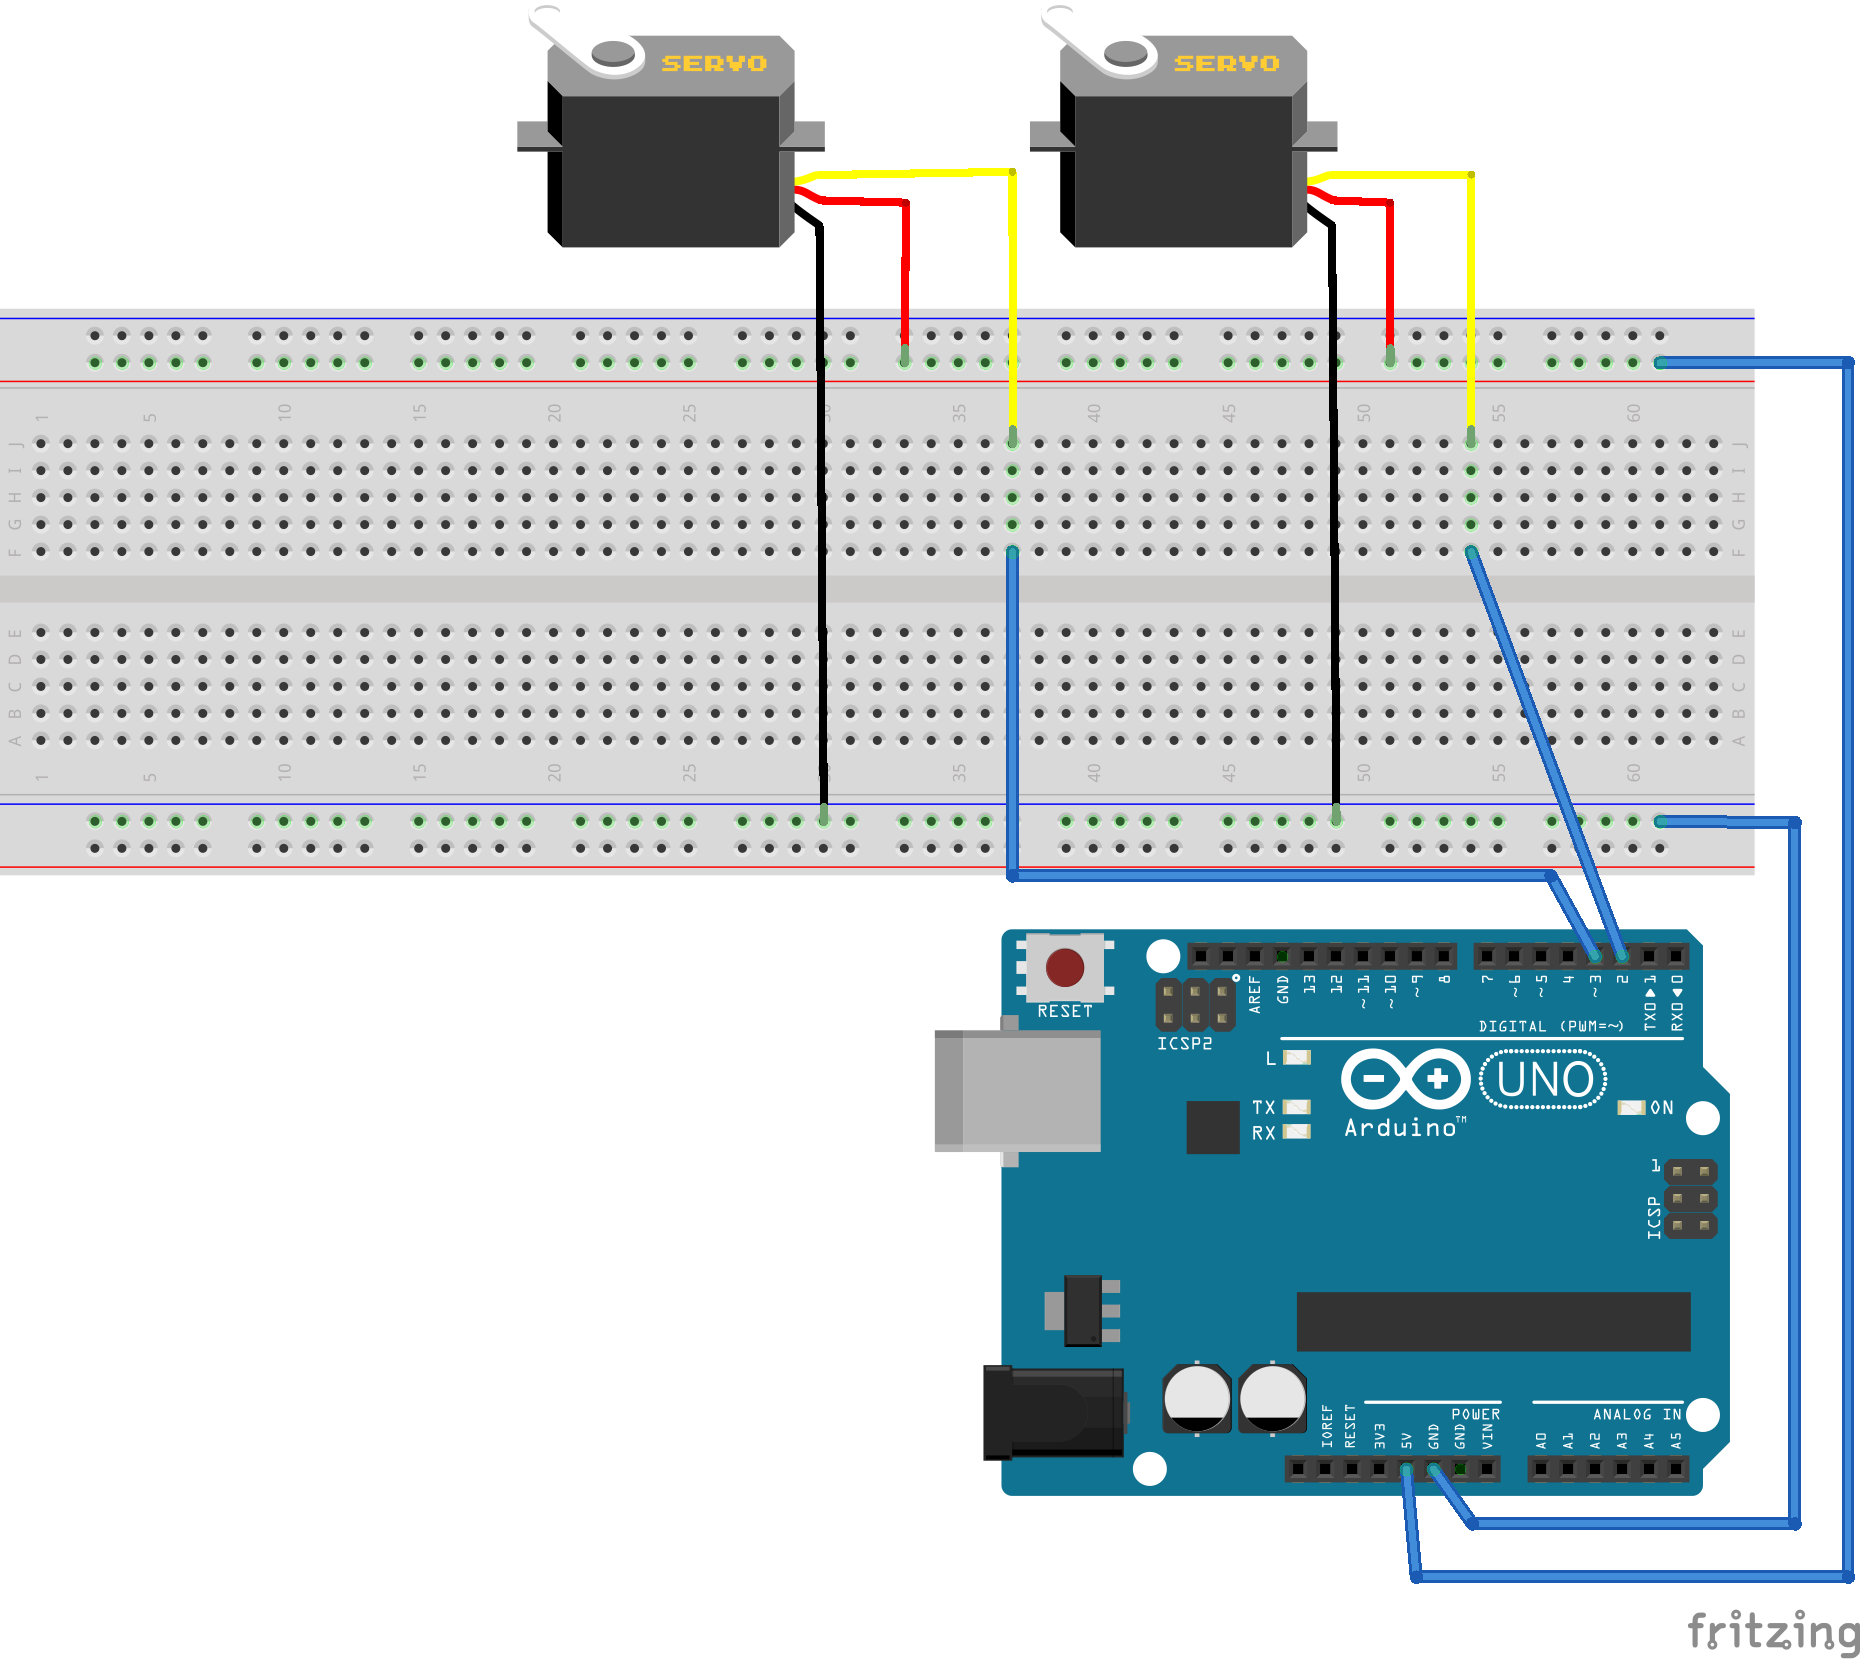
Note: It’s a good idea to wire the servos to the Arduino BEFORE plugging in the USB cable. This is because the power spike when the servos first turn on can reset the processor and lose the connection. If this happens, simply unplug and reinsert the USB cable. Similarly, if the servos are used to move too heavy a load, the processor may reset, and you will need to reinsert the USB cable to get the connection to work. If this continues to happen, either lighten the load on the servos, and/or add an external power supply.
Next, you will need to load the servo controller emulation code onto your Arduino. You can cut and paste the code below into the Arduino development environment, and program the board.
Finally, in VSA, you will need to select the appropriate COM port (it’s the same one you specified to program the board), and select SSC, 9600 baud (the default).
Pins 2-13 are available for driving servos. (0 and 1 are reserved for the communicating with the PC.) Set the channel to the number you are using. You can use a single Arduino to control up to 12 servos! However, you will need to supply an appropriate power supply – USB power won’t work. To use an external power supply, you will need to connect it to the servo power supply leads, and disconnect the +5V line from the Arduino. From the Arduino, you will need to connect the signal lines, as well as ground.
A final note: the code below is designed to drive the servo about 135 degrees max. Most servos can rotate this far without hitting their limits. It’s easy to modify the code to change the range…
// Serial Servo
// by Paul H. Dietz, 4/22/2014
//
// Allows an Arduino UNO to act like a Scott Edwards Mini Serial Servo Controller.
//
// Data Format:
//
// 9600 baud, 8-N-1
//
// Sync byte (255), Servo Num (2-13), Postion (0-254)
//
// Position to us:
//
// 6 * Position + 738
//
// 0 -> 738us, 254 -> 2262us
//
// This code is in the public domain. Use at your own risk.
#include <Servo.h>
byte ServoNum, ServoPos;
// Byte count for input
byte inCNT=0;
// create servo objects
Servo servo2, servo3, servo4, servo5, servo6, servo7, servo8, servo9, servo10, servo11, servo12, servo13;
void setup()
{
// Initialize serial:
Serial.begin(9600);
// Initialize Servos
servo2.attach(2);
servo3.attach(3);
servo4.attach(4);
servo5.attach(5);
servo6.attach(6);
servo7.attach(7);
servo8.attach(8);
servo9.attach(9);
servo10.attach(10);
servo11.attach(11);
servo12.attach(12);
servo13.attach(13);
}
/* Wait for data, then process
inCNT keeps track of current state:
0 – Waiting for sync byte
1 – Sync byte received
2 – Sync byte and ServoNum received
*/
void loop() {
while (Serial.available()) {
// get the new byte:
byte inByte = Serial.read();
if (inByte == 255){
// Sync found
inCNT = 1;
}
else {
if (inCNT == 1) {
ServoNum = inByte;
inCNT = 2;
}
else {
if (inCNT == 2) {
ServoPos = inByte;
setServo();
inCNT = 0;
}
else {
inCNT = 0;
}
}
}
}
}
void setServo() {
switch (ServoNum) {
case 2:
servo2.writeMicroseconds((int)ServoPos*6+738);
break;
case 3:
servo3.writeMicroseconds((int)ServoPos*6+738);
break;
case 4:
servo4.writeMicroseconds((int)ServoPos*6+738);
break;
case 5:
servo5.writeMicroseconds((int)ServoPos*6+738);
break;
case 6:
servo6.writeMicroseconds((int)ServoPos*6+738);
break;
case 7:
servo7.writeMicroseconds((int)ServoPos*6+738);
break;
case 8:
servo8.writeMicroseconds((int)ServoPos*6+738);
break;
case 9:
servo9.writeMicroseconds((int)ServoPos*6+738);
break;
case 10:
servo10.writeMicroseconds((int)ServoPos*6+738);
break;
case 11:
servo11.writeMicroseconds((int)ServoPos*6+738);
break;
case 12:
servo12.writeMicroseconds((int)ServoPos*6+738);
break;
case 13:
servo13.writeMicroseconds((int)ServoPos*6+738);
break;
}
}